The Ultimate Gluten-Free Strawberry Poke Cake Recipe with Jello
2026-09-11
Gluten-free sheet cake turns into slimy baby food if you pour liquid over it the wrong way.
My grandma used to make red strawberry poke cake for church picnics back in the nineties. Fluffy white cake, red gelatin streaks, tub of fake whipped cream on top. Everybody loved it.
The first time I tried making one gluten-free at our bakery? Absolute disaster.
The sponge soaked up the warm gelatin like a kitchen sponge. Within ten minutes, the entire bottom of the pyrex pan turned into purple sludge.
Here is what you actually have to do.
First, let the cake cool down completely. Second, do not pour hot liquid. You chill your strawberry gelatin in the walk-in until it turns syrupy, like cold pancake syrup. Then poke the holes only three-quarters down.
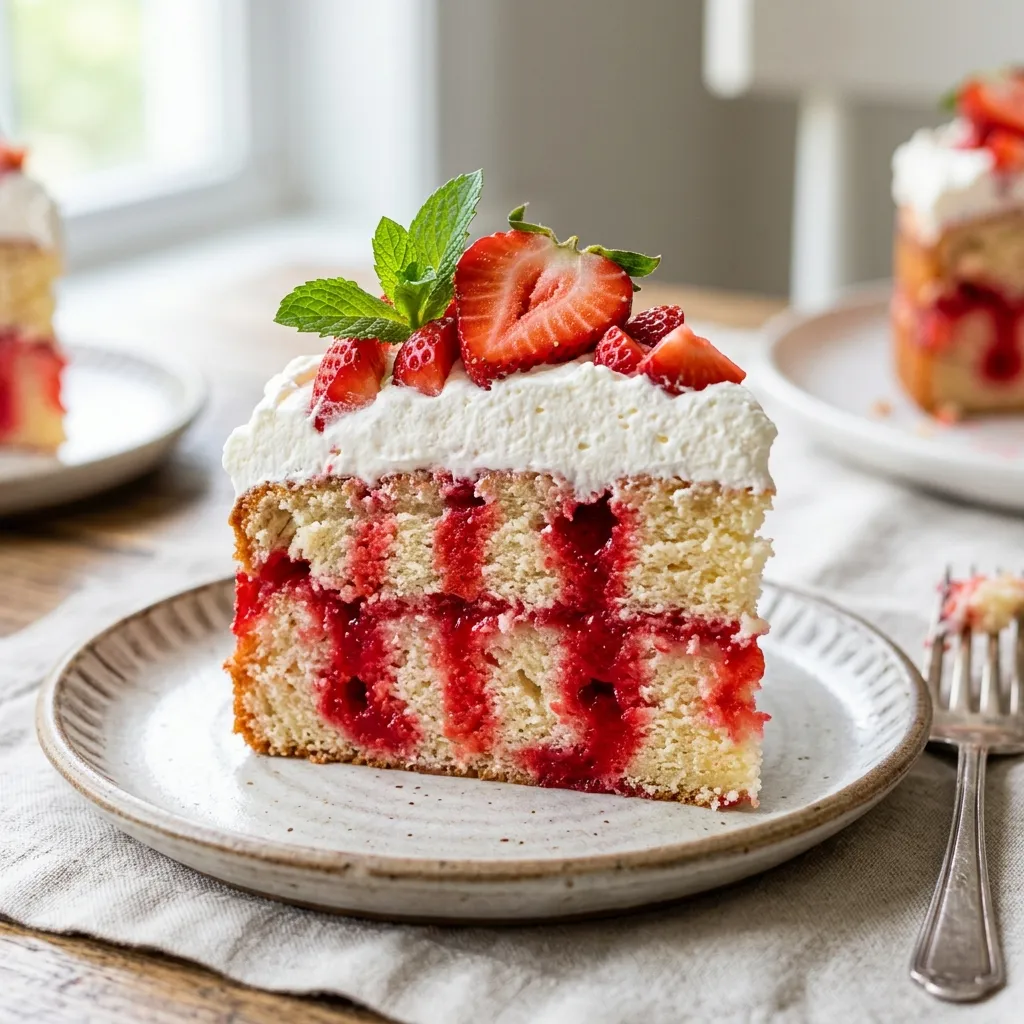
That gives you crisp red stripes running through clean cake layers. Zero mush.
Quick Baker's Notes for Best Results
- Hole Grid Spacing: 1/2-inch intervals across the entire sheet using a 1/4-inch round wooden spoon handle.
- Penetration Depth: Exactly 3/4 of the way through the cake (never pierce all the way to the pan bottom).
- Gelatin Fluidity Ratio: 85g gelatin powder bloomed in 240ml boiling water plus 120ml cold water (a 25% water reduction).
- Mandatory Setting Window: 4 hours minimum in the refrigerator at 38°F before topping with whipped cream.
The Food Science of Gelatin Absorption in Gluten-Free Crumb
Traditional poke cakes rely on wheat gluten's resilient cell walls to absorb liquid gelatin like a kitchen sponge without disintegrating. Gluten-free crumb, however, is delicate. If exposed to excess moisture, the rice starches swell, gelatinize, and collapse into sludge.
To keep the cake structurally sound while delivering vivid fruit stripes, we follow three scientific principles:
1. The 25% Gelatin Concentration Boost
Standard Jello box instructions tell you to add 1 cup of boiling water followed by 1 cup of cold water (480ml total). For a gluten-free poke cake, that is too much free water. We cut the cold water in half to 1/2 cup (120ml), reducing total liquid to 360ml. This increases the gelatin concentration, ensuring the liquid sets into firm, clean, distinct ruby-red ribbons that suspend inside the crumb rather than weeping water into the base.
2. The 3/4-Depth Penetration Rule
If you poke your holes all the way to the bottom metal pan, the liquid runs straight down the channels and pools beneath the cake. That puddle dissolves the bottom crust, creating a soggy, unsliceable mess. By stopping your tool three-quarters of the way down, the lower quarter of the sponge remains intact, acting as a sturdy structural floor. Review the King Arthur Baking guide on preventing soggy bottoms in soaked cakes for more on structural soaking mechanics.
3. Thermal Matching
Never pour boiling-hot gelatin over hot cake. Hot gelatin melts the butterfat in the crumb, creating grease streaks. Instead, let your baked cake cool to room temperature (70°F) and let your mixed gelatin cool to lukewarm (around 85°F to 90°F). At this temperature, the gelatin flows freely into the holes without shocking the crumb.
The Tool Debate: Wooden Spoon Handle vs. Fork
Many old recipe cards tell you to poke the cake with a table fork. In our kitchen tests, a fork is the worst tool you can use.
Fork tines create microscopic punctures that close up immediately as the sponge rebounds. When you pour the gelatin, the surface tension of the liquid cannot penetrate the tiny slits; the liquid simply ponds on top of the cake, leaving the crumb underneath bone-dry.
The ideal tool is the rounded handle of a wooden spoon or a clean 1/4-inch dowel. This creates wide, round cylindrical channels that guide the gelatin straight into the vertical grain of the sponge.
Ingredients
Whether baking from scratch or using a premium boxed mix, precise ingredient weights ensure an even crumb that absorbs gelatin uniformly. Use our density-accurate cups to grams converter to avoid measuring errors.
For the Gluten-Free Vanilla Sheet Sponge:
- Gluten-Free 1-to-1 Flour Blend (with xanthan gum): 280 grams (or 1 box 15-oz GF White/Vanilla Cake Mix)
- Baking Powder: 7 grams (1.5 teaspoons)
- Baking Soda: 2 grams (0.5 teaspoon)
- Fine Sea Salt: 3 grams (0.5 teaspoon)
- Granulated White Sugar: 200 grams
- Unsalted Butter (melted): 115 grams (1/2 cup)
- Large Eggs (room temperature): 3 (150 grams out of shell)
- Whole Milk: 180 grams (3/4 cup)
- Pure Vanilla Extract: 5 grams (1 teaspoon)
For the Strawberry Gelatin Soak:
- Strawberry Flavored Gelatin (GF certified, such as Jell-O): 85 grams (one 3-oz package)
- Boiling Water (212°F): 240 grams (1 cup)
- Ice-Cold Water: 120 grams (1/2 cup)
For the Stabilized Whipped Cream Topping:
- Heavy Whipping Cream (36%+ fat, chilled): 360 grams (1.5 cups)
- Powdered Sugar: 45 grams (approx. 1/3 cup)
- Pure Vanilla Extract: 5 grams (1 teaspoon)
- Fresh Strawberries (sliced, for garnish): 200 grams
Step-by-Step Instructions
1. Bake the Gluten-Free Sheet Cake
Preheat your oven to 350°F (177°C). Grease a 9x13-inch metal baking pan with butter and line the bottom with parchment paper.
In a large bowl, whisk the melted butter, sugar, eggs, milk, and vanilla extract until smooth. Sift in the gluten-free flour blend, baking powder, baking soda, and salt. Fold just until no dry pockets remain.
Pour into your prepared pan and smooth the surface with an offset spatula. Bake for 25 to 28 minutes until a toothpick comes out clean and the center registers 205°F. Cool the cake on a wire rack for one full hour until completely room temperature.
2. Punch the 1/2-Inch Channel Grid
Take the round handle of a wooden spoon (wiped clean with a damp cloth). Starting at one corner, press the handle straight down into the cake until you feel it reach about 3/4 depth. Twist slightly and lift straight out.
Repeat across the entire surface of the cake in neat rows spaced roughly 1/2 inch apart. You should have between 60 and 80 clean cylindrical channels.
3. Dissolve and Cool the Gelatin
In a heatproof 2-cup glass measuring jug, pour 240 grams (1 cup) of boiling water over the strawberry gelatin powder. Whisk vigorously for two full minutes until every single gelatin granule is dissolved. Stir in 120 grams (1/2 cup) of cold water.
Let the liquid sit on the counter for 10 minutes until it cools to lukewarm (between 85°F and 90°F).
4. The Precision Channel Pour
Using the spout of your measuring jug, slowly drizzle the lukewarm gelatin directly into the punched holes. Take your time: fill each channel to the brim, allow the liquid to soak downward into the sponge, then go back over any holes that emptied. Any remaining liquid can be drizzled lightly across the surface.
5. The 4-Hour Setting Chill
Cover the pan loosely with plastic wrap and transfer it to the refrigerator for at least 4 hours (or overnight). During this time, the gelatin sets into firm, vibrant red gelatin ribbons nestled inside the tender white sponge.
6. Whip and Frost
In a chilled metal bowl, beat the cold heavy cream, powdered sugar, and vanilla extract with a hand mixer on medium-high speed for 3 to 4 minutes until stiff, billowy peaks form.
Spread the whipped cream evenly over the chilled cake. Garnish with fresh sliced strawberries just before slicing and serving. (If you want to master exterior cake frosting and crumb coating for round celebration cakes, check out our complete guide to frosting cakes and crumb stability.)
Storage and Baker's Notes
Poke cakes are fantastic high-yield, low-cost sheet cakes for catering menus, church events, and family parties. Always verify that your commercial gelatin, sprinkles, and food dyes meet Celiac Disease Foundation safe gelatin and confectionery ingredients guidelines. Consult USDA FoodData Central gelatin and sucrose baseline nutrient data for standard macro breakdowns, and track your dairy and packaging margins using our bakery profit margin calculator.
Storage and Make-Ahead Tips
Keep poke cake covered in the refrigerator for up to 4 days. Because the gelatin syrup keeps the sponge delightfully moist, this cake actually tastes even better on day two! For best results, add fresh sliced strawberries just before serving so the fruit remains bright and juicy.
If you're bringing dessert to a gathering or selling sheet cake portions, check your batch costs with our Bakery Profit Margin Calculator.
This retro strawberry poke cake is fun, refreshing, and always a huge hit at potlucks and family get-togethers. Slice a square, top with whipped cream and fresh strawberries, and watch everyone come back for seconds!
Baking or Selling This Recipe? Use Our Free Tools
Baking in Your Kitchen? Convert & Scale in Grams
Measuring cups can vary by up to 25% in flour weight. Convert cups to exact metric grams or scale this entire recipe (2x, 3x) in seconds.
Selling Custom Cakes? Price for Real Bakery Profit
Calculate ingredient food costs, packaging, and labor to set high-margin pricing for your home bakery or custom pastry orders.

Sara Ait Dahan
Professional Baker & Founder of Sweety's Bakery
Passionate about baking precision and culinary science, Sara founded Sweety's Bakery to empower home bakers and pastry chefs worldwide. Built from real bakery workbench experience, she creates tested gluten-free recipes, calibrated density calculators, and bakery business tools.